Thermometer Calibration

Thermometers should be calibrated whenever they are dropped, before first use and during temperature extremes.

Temperature is a critical measurement for ensuring the safety and quality of many food products. Thermometer Calibration is essential from receiving, throughout production, final storage and distribution. The HACCP validation, verification reassessment section in Code of Federal Regulations (9CFR 3:417.4) specifies that instruments used for monitoring critical control points must be calibrated. Keep a thermometer calibration log.

Often, routine simple procedures ‘devolve’ into short cuts or bad habits that reduce the effectiveness or validity of the original protocol. This happens when original knowledge/understanding falls into blind protocols. The following discussion provides tips of good practice and reminders of why those tips were developed.

Quality is Consistency:
We realize that in a laboratory environment, thermometer clamps and posts are used as well as stirring hot plates. Many production facilities however will not ‘bother’ with this and will often make due. This is where an understanding of the process is just as important as keeping the process consistent. The tips provided use common ‘kitchen items’ that are found in all facilities.

Protocols and Tips

A. Ice Point Method

  1. Fill a tall insulated cup with 1/2 crushed ice and 1/2 water.
  2. After 5minutes, insert the thermometer at-center and off-bottom.  Slosh for good mixing.
  3. If reading is not 32°F +/- 2°F, then adjust thermometer.  The ice point method permits calibration to within 0.1°F.

    Tip: use crushed ice and thermos instead of Styrofoam

Reason: It becomes a matter of consistency.  Insulated cups are preferred when testing multiple thermometers over several hours of the day as the ice keeps longer.  If your procedure says –go find a styro-cup-, you are tempted to grab your soda cup for the test and probably use the left over ice.  But, if you have a fixed set of equipment set aside for the task, everyone is doing the same thing.

Reason: Crushed ice provides more surface area and improves thermal mixing near the thermometer tip when sloshed.  Keeping the tip centered in the cup develops good habits that ‘need’ to be carried on in the boiling point method.

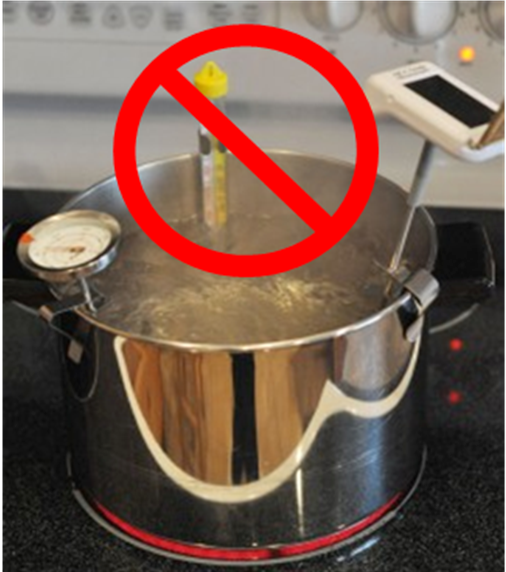
B. Boiling Point Method

  1. Pour distilled water into a Pyrex® container; heat to boiling.
  2. Then insert thermometer in center, 1-inch away from sides or bottom minimum.
  3. If reading is not 212°F +/- 2°F, adjust thermometer.  Ice point method permits calibration to within 1.0°F.

    Tip: Support with non-metallic holder: pasta scoop vs. clips to maximize distance from sides.

Reason: While boiling water in a metal pot or Pyrex® cup will always read 212oF, (upto1,000ft elevation) making contact with the sides can influence some thermometers.  A metal pot exterior will reach much higher temperature as it is ‘in the flame’.  A quick measurement of a metal pot exterior will show a thermal stratus:  Above Water level: >130F; in water level 212F-217F; bottom 1-inch of pot exterior >170F.  Being ‘off’ a few degrees at this point can have serious consequences.


(A Free copy of training a presentation is available.)

TIP: Review basic SOP’s with new and old employees.  Simple errors can cause
major issues.

How a Bimetallic Dial Thermometer Works:

And that’s your Nuggitz™ for today!

Posted in food safety testing | Leave a comment

Good Maintenance Practice – Beverage Dispensers and Sugar Snakes!

Beverage Dispenser drain lines often clog due to the formation of “sugar snakes”.  Sugar snakes are cellulose polymer strands formed by microbes feeding on an abundance of carbohydrates (sugar) from the soft-drink spillage.  Drain lines clog with a foul vinegar-like odor and the product overflows.

Convenience stores, fast food restaurants and others are familiar with costly emergency plumbing bills to clear drain lines.

Your options:

Management must constantly remind employees to pour chemicals down the dispenser drains regularly to (help) avoid clogs.  It’s like having to remember to dump ‘draino’ down the sink after every meal.

A preferred maintenance option is the use of slow release drain-treatments.  These multi-function products provide a constant, self-measured amount of biocide and dispersant to keep the drains clear with minimal maintenance.  They are activated by the soft-drink flow itself!  The more soft-drink is spilled, the more they are activated!

Microbica Laboratory Partners, Inc., in response to customer concerns has prepared a simple Beverage Dispenser Drain Audit Kit (BD2AK™) to keep drains clear and document the results!

BD2AK™ includes:

a)     NoSnake™ pak

b)    Audit Swab

c)     Service Log

This self-Audit kit is customized for the number of  beverage dispenser drains in your facility.

For example: if you have 3 beverage dispensers side-by-side, but one common drain line, each beverage dispenser will receive one NoSnake™ pak.  The single drain line will be swab-sampled before and after each installation.  Samples will be returned to the laboratory for a full laboratory report.

Your audit form can be emailed or faxed to be included with the Audit Report.

Restaurant and Convenience store chains also have the option of having a portfolio report.  Then beyond ensuring each store is complying with policy, you can compare multiple store results and identify areas needing improvement.  Audit Reports are graphical and provide statistical analysis as well!

Posted in gmp | Leave a comment

Nutritional Labels – Prepared and Unprepared ?

The FDA has issued an order expanding labeling requirements from Food Manufacturers and Packagers to Restaurants, Self-Serve Stations and Grocery Stores.  All must start providing nutritional label information.  This is causing a scramble to comply.  Many of you are using automated reporting systems.  Food offered for sale must be labeled (raw produce and fish are voluntary).

A question comes up in your form: Prepared and Un-Prepared Label?

FDA uses the terms ‘as prepared’ and ‘as packaged’.  Now things start to make more sense!

  • Breakfast Cereal is sold ‘as packaged’ but may be served ‘as prepared’ with milk.  This becomes a second column in your nutritional label panel.  Add the nutritional information from all ingredients to determine the ‘as prepared’ column.
  • Cake mix –a more complicated example:  Your powder mix will have one column for its nutritional value -’as packaged’.  However the second column may include the sum of nutritional values for eggs, liquids, etc.., of the baked cake!

Try to avoid non-FDA terms like ‘un-prepared’ label and you will be fine.

And that’s your Nuggitz™ for today!


Posted in Nutritional Labels, Uncategorized | Leave a comment